01coin Masternode Setup Guide
Table of Contents
- Prerequisites
- Stage 1: Setup Your Local 01coin Wallet
- Stage 2: Setup Your Remote Server
- Stage 3: Configure and Launch Your Masternode

By: Cpt.Ale and deadthings
Date: October 14, 2018
Revised: October 29, 2019
Prerequisites
To setup a 01coin masternode, you will need…
- A local computer running a modern version of Windows, Mac or a Debian-based Linux distro such as Ubuntu.
- A remote server (Virtual Private Server or "VPS") running a headless version of Ubuntu 16.04.
- At least 1001 ZOC (Note: A masternode requires exactly 1000 ZOC to start, but you need a little extra to cover transaction fees when setting it up).
Note that you can download a "printer-friendly" PDF version of this guide here: https://git.io/fxEWT.
Alternatively, you can follow Markdown versions of this guide on Steemit, Medium or GitHub, depending on whichever platform you prefer.
Stage 1: Setup Your Local 01coin Wallet
Download, sync and encrypt
Download and open the most recent 01coin wallet version for your operating system from here: https://github.com/zocteam/zeroonecoin/releases. Wait for the network syncing process to complete. You may wish to accelerate the syncing process by using a bootstrap file. The instructions and download links for using a bootstrap file for syncing can be found here: https://github.com/zocteam/zoc-bootstrap.
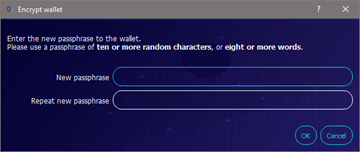
Once your wallet is fully synced with the network, it is recommended that you encrypt your wallet with a strong and unique password prior to sending any funds to it by going to Settings > Encrypt wallet. If you forget this password, you will lose access to your ZOC so it is important that you remember it or write it down somewhere safe.
Setup masternode collateral address
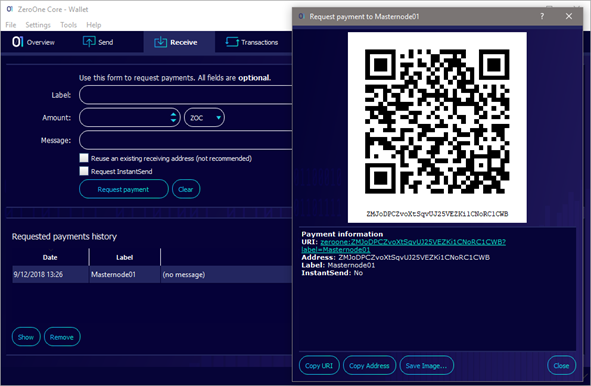
Next, you will create a collateral address for your masternode. This is where the coins for your masternode will be stored.
Click on the Receive tab and enter a label to help you easily identify your masternode. It might be a good idea to call it something like Masternode01 in case you decide to launch more ZOC masternodes later. Leave all other fields blank and make sure to uncheck “Request InstantSend.”
Then click “Request payment” and a window will pop up with your new ZOC address. Click “Copy Address” and then “Close.”
Fund your masternode collateral address
The next step is to send exactly 1000 ZOC to your masternode collateral address. If you already have at least 1001 ZOC in your wallet, you can do this in one step. If your coins are on an exchange, however, you will first have to send at least 1001 ZOC to your address.
Click on the Send tab, and paste the address you just copied into the “Pay To” field. Confirm that the label you created for that address (e.g., “Masternode01”) automatically appears in the “Label” field. Type 1000 into the “Amount” field and ensure that the “Subtract fee from amount” box is unchecked.
Then click “Send” to initiate the transaction. You may have to key in your wallet password if it is locked. A pop up window will appear detailing the transaction fees and asking you to confirm the transaction. Click “Yes” to proceed.
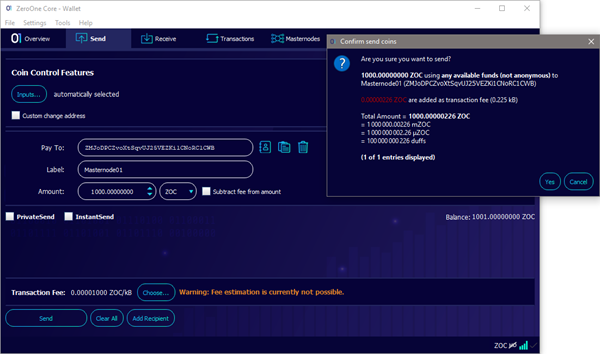
Please note that the network will need to confirm this transaction a minimum of 15 times before you can start your masternode. This process will usually take 35 to 40 minutes, on average.
Start collecting info for masternode.conf
That 1000 ZOC transaction you just made is now recognized by the network as masternode collateral. In order to use it to launch a masternode, you will need to collect the TXID and index numbers from the transaction.
To do this, click on Tools > Debug console. In the window that pops up, there is a data entry field at the very bottom. In this field, type:
masternode outputs
This will return your TXID and index numbers for your masternode collateral transaction.
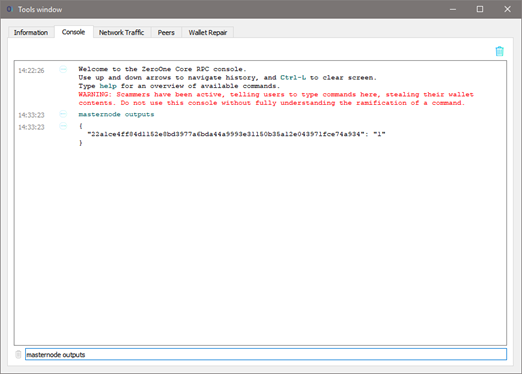
Copy both numbers and paste them into a text file. You will need them later. Go ahead and close your wallet now by going to File > Exit.
Important note: Heed the console’s red-text warning! Many people have been swindled by scammers telling them to type things like dumpprivkey and dumpwallet into this console window. Stay on your toes; stay safe; keep your coins!
Stage 2: Setup Your Remote Server
Choose one of the following three methods to setup your remote server, and proceed to the appropriate subsection below:
- Method 1: Automagic installation with 01VPS.net
- Method 2: Semi-automated installation with masternode setup script
- Method 3: Manual installation (advanced users only)
Method 1: Automagic installation with 01VPS.net
The easiest and recommended way to set up your remote masternode server is to use 01coin's affiliated service, 01VPS.net. Register for an account at https://01vps.net/ (or https://01VPS.net/secure/aff.php?aff=55 if you want to help support the authors of this document with referral commissions).

After logging into your account, go to Services > Order New Services. Here you will see a screen of the available servers. Note that 01VPS.net offers both VPS and web hosting packages.
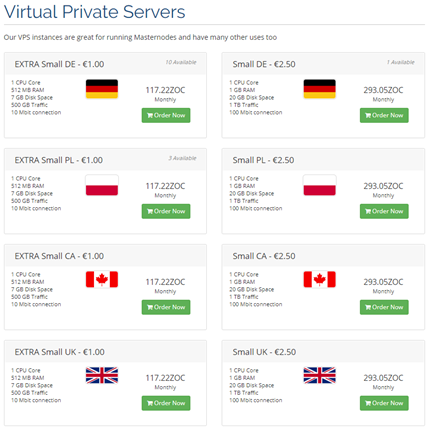
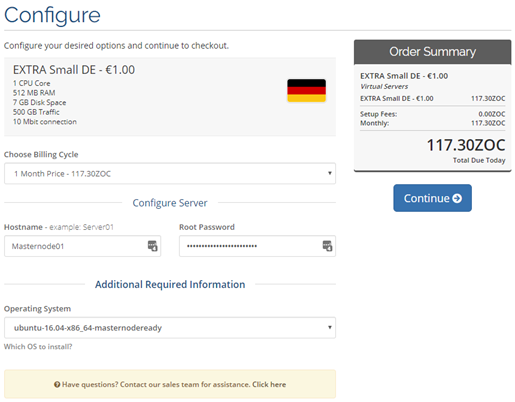
Select the server you want to order (Extra Small packages are sufficient to host a 01coin masternode) and configure it with a hostname and password. Make sure to use a complex password otherwise you may lose control of your server to a password-guessing bot. We recommed using a service such as LastPass for password generation and storage. The password you choose here will be emailed to you, so provided you keep that email or copy the password somewhere safe you won’t lose access to your server even if you forget it.
Below that, select your operating system. You will see that there are a number of Linux distros available for you to choose from. The one we recommend you choose to install is:
ubuntu-16.04-x86_64-masternodeready
It is selected by default. Next, click “Continue,” confirm your order on the next screen (and enter any promo codes that may be available) and click “Checkout” to pay for your new VPS using ZOC.
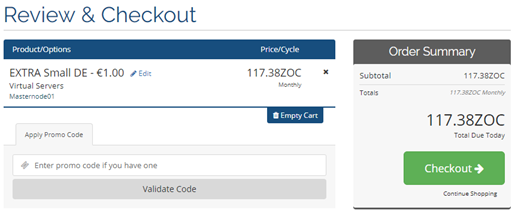
To complete your order, send the balance owing to the ZOC address provided within 24 hours. Please note this is a single-use ZOC address. Do not send future payments to the same address. Instead, a new payment address will be generated for you with each subsequent invoice.
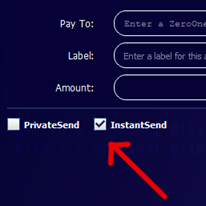
We recommend checking the box for InstantSend when sending your payment to 01VPS.net to avoid any potential blockchain delays in your transaction.
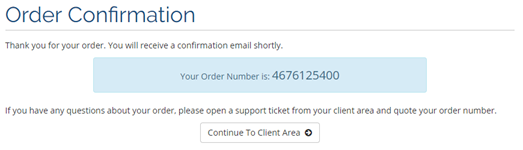
In order for your payment to be processed, you must leave the invoice webpage open until it is marked as PAID. Once the transaction has been confirmed you will receive an Order Number. At this point, you may click “Continue To Client Area” at the bottom of the screen.
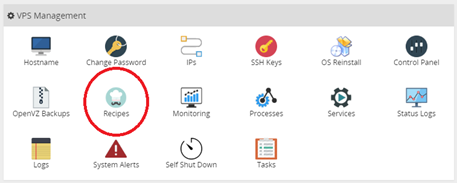
Within the client area, you will see your new server listed under “Your Active Products/Services.” Clicking on it will take you to the management screen. Under “VPS Management” you will see an icon for “Recipes.”
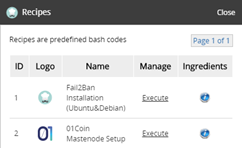
Click on “Recipes” and then click “Execute” where it says Fail2Ban Installation. Confirm that you wish to cook this recipe on the pop-up screen, and then acknowledge it has been cooked. Next, click “Execute” where it says 01coin Masternode Setup. Confirm that you wish to cook this recipe on the pop-up screen, and then acknowledge it has been cooked.
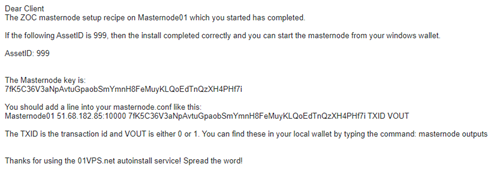
Now you simply sit back and wait for your 01coin masternode to be automagically setup for you. This process generally takes approximately 30 minutes to complete. Once completed successfully, you will receive an email with more information that you will need to populate your masternode.conf file.
Your remote VPS is now completely setup and ready for masternode activation. No need for SSH software and no need to learn any Linux commands! If you found this process easy and straightforward, please help us out by spreading the word about 01VPS.net!
You may now skip to Stage 3: Configure and Launch Your Masternode.
Method 2: Semi-automated installation with masternode setup script
Another simplified 01coin masternode installation method is to use the semi-automated masternode setup script provided by the zocteam. The advantage of the masternode setup script is that it is provider-agnostic and will work with 01VPS.net as well as any other VPS provider of your choosing.
Of course, we still recommend 01VPS.net, which you can sign up for at https://01vps.net/ (or https://01VPS.net/secure/aff.php?aff=55 if you want to help support the authors of this document with referral commissions).
Since you are free to select any VPS provider for this installation method, though, this section of the guide will assume you already have or already know how to sign up for a VPS provider of your choice. If you would like more information about how to sign up for 01VPS.net, please refer to Stage 2 – Method 1 of this guide.
For this installation method, you will need:
- A VPS server running Ubuntu 16.04.
- The IPv4 address for your server (or, if equipped with multiple IP addresses – the main address used for logging in).
- Your server login name (often – but not always – root).
- Your server password.
- An SSH client such as PuTTY for Windows, Terminal for Mac, JuiceSSH for Android, etc. Please note the instructions provided in this guide will be specific to PuTTY for Windows.
To login to your server, open your SSH client software. This guide will show you how to use PuTTY for Windows, but feel free to use whichever SSH client you prefer. To begin, enter your VPS server’s IPv4 address into the “Host Name (or IP address)” field. Make sure you choose SSH as your Connection type, and leave the Port as the default 22. Then click the “Open” button at the bottom.
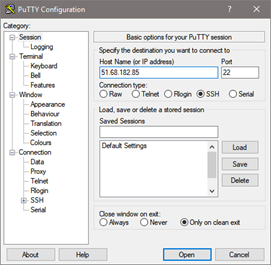
If this is your first time logging into your server, a PuTTY security alert will pop up asking you to confirm that you want to add a host key for the new connection. Click “Yes.”
Login to your server with your login name and password credentials. If you used a strong and difficult-to-type password for your VPS server as you should – don’t fret. You can paste anything from your Windows clipboard into your SSH terminal by simply right-clicking anywhere within the PuTTY window. This tip will come in handy often.
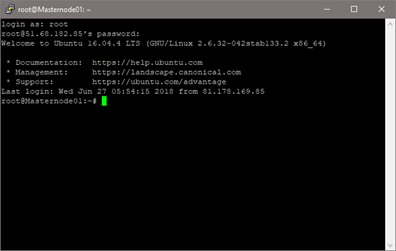
Once you have successfully logged into your server, copy the following line of text and paste it into your SSH session by right-clicking in the PuTTY window then hit Enter to execute:
sudo wget -O setup_zoc_mn.sh https://git.io/vx0Go && sudo chmod +x setup_zoc_mn.sh && sudo sh setup_zoc_mn.sh
Depending on your VPS provider, it is possible this line might fail with the following error:

If that occurs, use the following line instead. Copy and paste into PuTTY and hit Enter to execute.
apt-get update && apt-get install sudo -y && sudo wget -O setup_zoc_mn.sh https://git.io/vx0Go && sudo chmod +x setup_zoc_mn.sh && sudo sh setup_zoc_mn.sh
Upon executing the script, it will ask you the following questions:
- Would you like to setup a swapfile to help with compiling? (Type Y)
- Is this your VPS IP address? (If correct type Y, otherwise type N and input your VPS IP address)
- Would you like to provide a private key (if you already have one)? (Type N)
- Would you like a shell script to start the node? (Type Y)
- Would you like to start the node automatically on boot? (Type Y)
- Would you like to install a node manager to keep the blockchain synced? (Type Y)
If the script completes correctly, it will end with a screen like this:
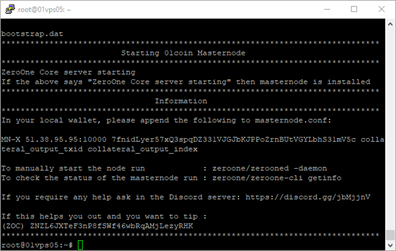
That screen tells you all the information you need to know from your VPS to configure your masternode in Stage 3 of this guide, so copy it down. Simply highlighting the text of a PuTTY screen will commit it to your local clipboard so that you can paste it into a text file.
When the script has finished running, you can monitor the syncing process by doing:
watch zeroone/zeroone-cli getinfo
Use Ctrl-C to exit watching. You will know you are fully synced once the top line “AssetID” returns 999 when you do:
watch zeroone/zeroone-cli mnsync status
Once mnsync status shows an AssetID of 999, use Ctrl-C to exit watching and you are now ready to proceed to Stage 3 to configure and launch your masternode. To make sure your masternode launches correctly after you have completed Stage 3, you can watch its status on the VPS server directly by doing:
watch zeroone/zeroone-cli masternode status
Once you use start-alias on the local wallet to launch your masternode, the first line (“outpoint”) should change from a row of zeroes to your masternode TXID number.
Your remote VPS is now completely setup and ready for masternode activation. You may now skip to Stage 3: Configure and Launch Your Masternode.
Method 3: Manual installation (advanced users only)
The third method for installing a 01coin masternode is to manually tackle all of the steps on your own. This method is recommended for advanced users only. Once you have mastered the first and second methods of installation, though, learning how to manually setup your masternode will help you later with troubleshooting as well as provide valuable insight into how masternode installation works for other coins.
Since this method is recommended for advanced users only, it is assumed you already know how to SSH into your VPS server. So, to begin, spin up a new VPS server running Ubuntu 16.04 and login. Make sure sudo is installed:
apt-get install sudo -y
Once you’ve confirmed sudo is installed, the first thing you are going to do is make sure your VPS is up-to-date and add the Bitcoin repository:
sudo apt-get update && sudo apt-get upgrade -y && sudo apt-get dist-upgrade -y && sudo apt-get install software-properties-common -y && sudo add-apt-repository ppa:bitcoin/bitcoin
At the end of this process, you will be prompted to hit Enter to continue adding the Bitcoin repository. Hit Enter.
To avoid any potential conflict with the next step, you should now reboot your server by doing:
sudo reboot
This will close your current SSH session, so you will have to login again. Your next step is to add a wide array of dependencies that your masternode will rely on plus some useful apps for masternode management:
sudo apt-get update && sudo apt-get install build-essential libtool dh-autoreconf autotools-dev autoconf automake make qt5-default pkg-config libssl-dev libboost-all-dev libminiupnpc-dev libevent-dev bsdmainutils libprotobuf-dev protobuf-compiler libqrencode-dev libgmp3-dev libzmq3-dev libqt4-dev libqrencode-dev python3 libdb4.8-dev libdb4.8++-dev fail2ban git nano htop pwgen zip unzip -y
Once this process is complete, you may optionally attempt to add a swap file to your VPS server, giving more available virtual memory (albeit at a significant performance reduction cost). Please note that only some VPS servers support manually adding swap space, so it is possible this process will fail. For instance, this process will not work with 01VPS.net servers, which already come pre-configured with a swap file. To begin, create and start a 4GB swapfile:
sudo fallocate -l 4G /swapfile && sudo chmod 600 /swapfile && sudo mkswap /swapfile && sudo swapon /swapfile
If this process completes successfully, move on to the next step below. If, however, it results in an error such as this one…

…then your VPS provider has disabled manually adding swap space. So you might as well free up that 4GB of reserved space by doing: sudo rm -fr /swapfile
However, if the process did complete successfully, then the next step is to set your swapfile to persist after rebooting. To accomplish this, you must edit the file system table:
sudo nano /etc/fstab
On an empty line at the bottom of that file, copy and paste the following:
/swapfile none swap sw 0 0
Then do Ctrl-X to close, Y to confirm.
Your system is now prepped to install a 01coin masternode. There are two options available to you: 1) Use pre-compiled binaries provided by the zocteam, or 2) Compile your 01coin binaries yourself.
Utilizing pre-compiled binaries provided by the zocteam is desirable in particular for those who are running a low-powered VPS server for their masternode, as compiling the binaries yourself on such systems can be very time-consuming and may not even be possible in the absence of enough available virtual memory.
If, on the other hand, you run a robust VPS server with lots of available memory and processing power, then compiling your own binaries from source provides assurances of security and performance optimization specific to your system. Plus – if you’ve never done it before – it’s fun to learn!
01coin installation: Pre-compiled binaries method
To use pre-compiled binaries provided by the zocteam, the first step is to download and extract the binaries compatible with your Ubuntu 16.04 VPS:
mkdir -p zeroone && cd zeroone && sudo wget https://github.com/zocteam/zeroonecoin/releases/download/v0.12.3.7/zeroonecore-0.12.3.7-x86_64-linux-gnu.tar.gz && tar xvzf zeroonecore-0.12.3.7-x86_64-linux-gnu.tar.gz && cd zeroonecore-0.12.3/bin && mv * ~/zeroone && cd ~/zeroone && rm -rf zeroonecore-0.12.3 && rm -f zeroonecore-0.12.3.7-x86_64-linux-gnu.tar.gz
Once this is finished executing, continue with Method 3 below.
01coin installation: Compile method
To compile your own binaries, you must download the source code from the zocteam GitHub, configure it for your system and then compile it. Depending on the performance specs of your VPS server, this process can take up to an hour to complete:
sudo git clone -b master https://github.com/zocteam/zeroonecoin zeroone && cd zeroone && sudo ./autogen.sh && sudo ./configure --without-gui --disable-tests && sudo make -j $(nproc) && cd src && sudo strip zerooned zeroone-cli zeroone-tx && cd .. && sudo make install
Once this is finished executing, continue with Method 3 below.
Method 3: Manual setup continued…
You now have 01coin binaries installed on your VPS. Congrats! Since you must now wait for the daemon to fully sync, it is recommended you speed up the process by using a bootstrap file provided by the zocteam.
cd $HOME && mkdir -p .zeroonecore && cd .zeroonecore && wget https://files.01coin.io/mainnet/bootstrap.dat.tar.gz && tar xvzf bootstrap.dat.tar.gz && rm bootstrap.dat.tar.gz
Now open your 01coin configuration file:
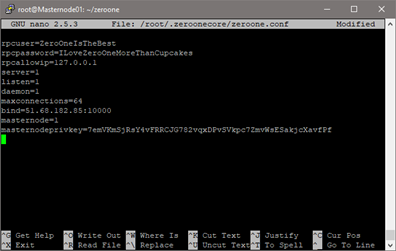
nano zeroone.conf
In that file, enter the following information. Substitute the information in parantheses with the information relevant to your own server (but don't use parantheses). Use only upper- and lower-case letters and numbers in the rpcuser and rpcpassword fields, as not all symbols and special characters are compatible.
rpcuser=(SomethingComplicated1)rpcpassword=(SomethingEvenMoreComplicated2)rpcallowip=127.0.0.1server=1listen=1daemon=1maxconnections=16bind=(YOUR_IPv4):10000
Then do Ctrl-X to close, Y to confirm.
(Note: if you would like to generate a random rpcpassword for your config file instead, you may do so by doing pwgen -s -cn 44 1 prior to editing your file. Remember — it is not important that you remember your rpcuser or rpcpassword, just that you don’t change them while the daemon is running.)
Now launch the 01coin daemon:
cd ~/zeroone && ./zerooned -daemon
The rather long and tedious wait to sync with the network begins. You may optionally choose to monitor block-by-block progress by doing:
watch ./zeroone-cli getinfo
Note that it can often take a few minutes to begin syncing – particularly when using the bootstrap file. Use Ctrl-C to exit watching. You will know you are fully synced once the top line “AssetID” returns 999 when you do:
watch ./zeroone-cli mnsync status
Once mnsync status shows an AssetID of 999, use Ctrl-C to exit watching and generate a masternode privkey:
./zeroone-cli masternode genkey
Copy this private key as you will need it for both the zeroone.conf file on your VPS as well as the masternode.conf file on your local machine during Stage 3 of this guide. With the masternode privkey copied, stop the 01coin daemon:
./zeroone-cli stop
And open your 01coin configuration file once again:
nano ~/.zeroonecore/zeroone.conf
At the bottom of that file append the following two lines:
masternode=1masternodeprivkey=ThePrivateKeyYouJustCopied
Your zeroone.conf should now look something like this:
Do Ctrl-X to close, Y to confirm. Relaunch the 01coin daemon again for the last time:
./zerooned -daemon
The next step is to install 01coin Sentinel, which is a mandatory requirement for running a masternode. There are two options to choose from for installing 01coin Sentinel. You may choose to install 01coin Sentinel using a script, or you can do it yourself manually.
01coin Sentinel installation: Script method
You can take a shortcut by using a prepared script to install be doing:
wget -O sentinel-one-line-insaller.sh https://git.io/fx0e2 && sudo chmod +x sentinel-one-line-insaller.sh && sudo sh sentinel-one-line-insaller.sh
Once complete, continue with Method 3 below.
01coin Sentinel installation: Manual method
If you would prefer to install 01coin Sentinel manually instead, begin by installing the required dependencies:
sudo apt-get -y install python-virtualenv virtualenv
The next step is to download, install and start 01coin Sentinel:
git clone https://github.com/zocteam/sentinel.git zoc_sentinel && cd zoc_sentinel && virtualenv ./venv && ./venv/bin/pip install -r requirements.txt
The last step is to add 01coin Sentinel to your crontab to make sure it runs every minute. So open your crontab by doing: crontab -e
If it asks you to select an editor, enter the number 2 to open your crontab using nano.

Once your crontab is open add the following line to the bottom of that file. Make sure to substitute the actual path to zoc_sentinel if located in a directory other than /root/.
* * * * * cd /root/zoc_sentinel && SENTINEL_DEBUG=1 ./venv/bin/python bin/sentinel.py >> sentinel.log >/dev/null 2>&1
Once complete, do Ctrl-X and Y to save your crontab and exit, then continue with Method 3 on the next page.
Method 3: Manual setup continued…
You may optionally choose to install a masternode manager, which will make sure that your masternode stays synced with the network. First, download the manager and set the permission to be able to execute it:
wget -O mnchecker https://git.io/fx0v0 && chmod +x mnchecker
Next, add it to the crontab so that it checks the sync status of your masternode every 10 minutes. First, open your crontab by doing: crontab –e. Then add the following line to the bottom of that file. Make sure to substitute the actual path to mnchecker and to your zeroone directory if located somewhere other than /root/.
*/10 * * * * /root/mnchecker --currency-bin-cli=/root/zeroone/zeroone-cli --currency-bin-daemon=/root/zeroone/zerooned --currency-datadir=.zeroonecore
You are now ready to proceed to Stage 3 to configure and launch your masternode. To make sure your masternode launches correctly after you have completed Stage 3, you can watch its status on the VPS server directly by doing:
watch ./zeroone-cli masternode status
Once you use start-alias on the local wallet to launch your masternode, the first line (“outpoint”) should change from a row of zeroes to your masternode TXID number.
Your remote VPS is now completely setup and ready for masternode activation. You may now proceed to Stage 3: Configure and Launch Your Masternode.
Stage 3: Configure and Launch Your Masternode
Edit masternode.conf
You should now return to your local machine where you earlier downloaded the 01coin wallet during Stage 1. Make sure your 01coin wallet is still closed before proceeding. You are now going to edit your masternode.conf file to configure your masternode.
The default directory in which you will find the masternode.conf file depends on which operating system you are using:
- Windows:
%appdata%\ZeroOneCore\ - Mac OS X:
~/Library/Application Support/ZeroOneCore/ - Linux:
~/.zeroonecore
Open masternode.conf for editing with a text editor such as Notepad for Windows, TextEdit for Mac or Nano for Linux. Follow the instructions provided in that file by typing and/or pasting the following information separated by spaces: a name or alias for your MN (e.g., mn1), the IP address and port for your remote masternode, the private key for your remote masternode, the TXID for your masternode collateral transaction, and lastly, the index number for your masternode collateral transaction.

- alias: This should be a name that will help you identify the masternode and distinguish it from any others you may later launch.
- IP:port: This is the IP address of your remote server in x.x.x.x format, followed by a colon (:) and the number 10000. The port number for a 01coin masternode is always 10000.
- masternodeprivkey: This is the private key you generated on the remote server.
- collateral_output_txid: This is the 64-character transaction ID from when you sent 1000 ZOC to your masternode collateral address. You can review this by typing
masternode outputsin the debug console of your local wallet at any time. - collateral_output_index: This is the number following your collateral_output_txid when you type
masternode outputsinto your debug console. It will almost always be either 0 or 1.
Once you have entered all of that data into masternode.conf, save it and close it. Then, reopen your 01coin wallet.
Start your masternode
Go to the Masternodes tab in your wallet and you will now see your 01coin masternode. Its status will be reported as MISSING as you have not yet started it.
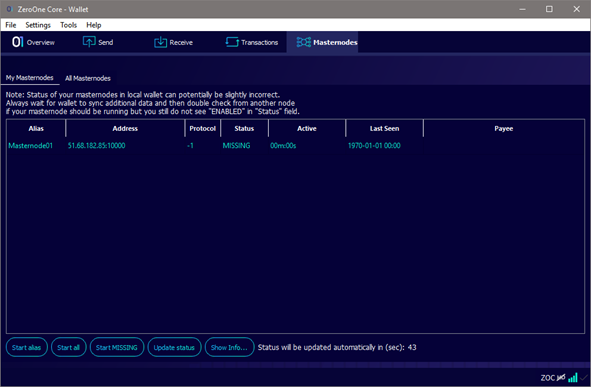
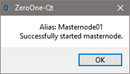
To start your masternode, you must unlock your wallet by going to Settings > Unlock wallet and typing in your password. Click on your masternode in the Masternodes tab, then click the “Start alias” button. A window will pop up asking for confirmation, so click “Yes” to confirm. Assuming you followed all of the steps in this guide correctly, another window will pop up confirming your masternode has been successfully started!
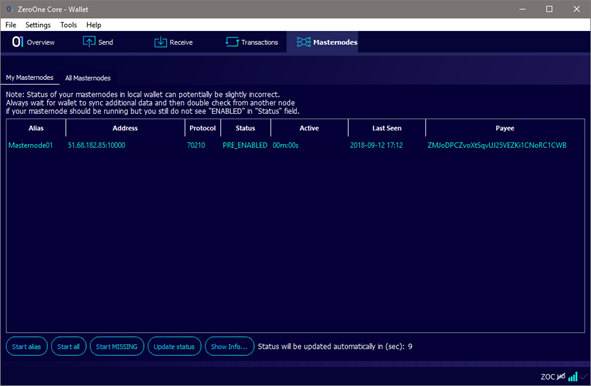
Once you click “OK” on the pop-up window, you will see the status of your masternode has switched from MISSING to PRE_ENABLED.
Confirm success
Your new masternode will remain in PRE_ENABLED status for approximately 15 to 60 minutes. Eventually, it will transition to a status of ENABLED.
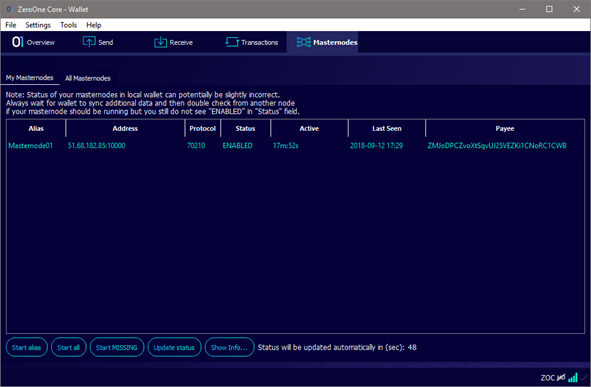
Congratulations! Your 01coin is now enabled and online. That means you are now contributing to 01coin’s network consensus and supporting features such as PrivateSend and InstantSend. In exchange for your support, you should soon start receiving masternode rewards (currently worth 13 ZOC). Visit https://masternodes.online/currencies/ZOC/ to find the average masternode reward frequency, and please note that it can take up to double the average period of time to receive your first reward.
If your masternode does not transition to ENABLED and instead goes into a status of MISSING, NEW_START_REQUIRED, POSE_BAN, SENTINEL_PING_EXPIRED or EXPIRED then it is likely you did not follow this guide correctly. You can either start over from the beginning and try to follow this guide more closely or you may choose to seek out individualized technical support to figure out what went wrong. You may find technical support for masternodes on our Discord server at https://discord.gg/wq5xD6M in the #masternodes channel.
Thanks for supporting 01coin by launching a masternode – and remember…
With 01coin, the future is in your hands!